Native/Kernel modules in Elm 0.19

Elm 0.19 made it purposefully difficult to use what was previously called ”Native” and is now called ”Kernel” code. Both of those things mean calling JavaScript straight from Elm without going through ports. Doing that is of course a Bad Idea™ but what if you still want to do it?

So what’s the difficulty. These lines from Package.hs in the compiler are the principal problem

isKernel :: Name -> Bool
isKernel (Name author _) =
  author == "elm" || author == "elm-explorations

The meaning here is that Kernel packages are to be used only by the Elm core team and only in packages. Not end applications and not anybody else.

Suppose you wanted to have some Kernel in your project. Not perhaps because you needed it, but because you wanted it. Or it made your life easier. What you really should do, what the true real solution is, is fork the compiler. This post is not about that solution.

Hacking Elm to accept user Kernel code

Only packages by blessed authors are ok. Fine, let’s make one then. As far as I can tell there is no officially supported way to install dependencies from anywhere other than package.elm-lang.org. Luckily those are cached at ~/.elm and we can drop code there and have the compiler find it.

The structure of ~/.elm is something like the following

.elm                                
└── 0.19.0
└── package
├── elm
│ ├── core
  │ │ └── 1.0.2
│ │ ├── elm.json
│ │   ├── [ ... other files ]
│ [ ... other packages ]
├── elm-explorations
│ [ ... packages ]
├── [ ... other authors ]
└── versions.dat

One would think that one can just drop a folder in ~/.elm/0.19.0/elm/my-package/ and be done with it. Sadly no, as the compiler checks first that versions.dat for the package name and version requested. That file is a cached representation of the list of all packages received from an API request to package.elm-lang.org.

versions.dat is in a custom binary format that is quite understandable just by looking at it. One would think that one could just add a custom package in the elm namespace there. Sadly no, as the compiler seems to rewrite the file.

What does work is choosing a package name and version that exists in package.elm-lang.org but is not used by a project that is being worked on. In my case I just took the first elm-explorations package from the list, and that happened to be ”benchmark”.

This is what my file structure looks like

elm-explorations
└── benchmark
└── 1.0.0
├── elm.json
└── src
├── Elm
│   └── Kernel
│   └── Foobar.js
└── Foobar.elm

Contents of the files

Foobar.elm:

module Foobar exposing (alert)
 
import Elm.Kernel.Foobar
 
 
alert : String -> String
alert msg =
    Elm.Kernel.Foobar.alert msg

Foobar.js

/*
*/
 
 
function _Foobar_alert(str) {
  alert(str);
  return str;
}

elm.json

{
  "type": "package",
  "name": "elm-explorations/benchmark",
  "summary": "",
  "license": "MIT",
  "version": "1.0.0",
  "elm-version": "0.19.0 <= v < 0.20.0",
  "exposed-modules": ["Foobar"],
  "source-directories": [
    "src"
  ],
  "elm-version": "0.19.0",
  "dependencies": {
    "elm/core": "1.0.0 <= v < 2.0.0"
  },
  "test-dependencies": {
  }
}

Now you can add

"elm-explorations/benchmark": "1.0.0"

To your application dependencies and you have again access to Native/Kernel code. Of course if your project uses elm-explorations/benchmark, choose some other package that you don’t need.

If you are unsure about whether you need Native/Kernel code, just don’t. This is not a good idea. If you decide you do need/want Kernel in your project, consider gathering others like you and forking the compiler. If you have carefully considered the above two options but still want to just do it the hacky way: well, this is one way to do it.

Transferring a .fi domain after expiry

Figuring out how to do something on the spot after it’s too late is never fun. A domain name I’m responsible for expired recently and suddenly the organization using it was without a web site and email forwarders. How could I let this happen? I wasn’t looking. Why wasn’t I looking? Because I implicitly assumed without thinking that the registrar would let me know by email before letting the domain expire. Not this registrar.

The registrar and hosting provider we were using is a single person shop in rural Finland. It has provided cheap service for us for many years. Not ”cheap but good”, mind you: just cheap. I’ve been responsible for the web stuff in our volunteer organization for a couple of years now, and this is the third time we’ve had a big outage. Time to switch.

How transferring works

It used to be, that when you registered a .fi domain, you got an authorization key, which consisted of several numbers, from the registry. In this case the registry is a branch of the Finnish government called Ficora. The authorization key was a persistent password of sorts that was the same from one registrar to another. The domain name has been registered all the way back in 1999, so when I started looking after the web stuff I didn’t have the key. Since this wasn’t my first rodeo with this provider, I had gotten a hold of the key in the previous round of downtime.

Getting the key

I am not the contact of record with the registry, the previous maintainer is. (I should really look into getting that changed). The way to get the authorization key was that I called the registry, and they mailed (the dead trees kind of mail) the key to the previous web person, who promptly delivered it to me at a party half a year later. I could have called them and gotten it sooner, but at that point in time I wasn’t transferring the domain because the downtime had gotten resolved before getting to that.

This time around I thought I was prepared, I had off site backups, I had the authorization key, in short: everything.

Not really

As you may have noticed from the past tense: the authorization key is worth jack all nowadays. The current system since fall 2016 is to get a single use transfer key consisting of random ASCII characters (numbers, alpha characters, special characters) you get from the previous registrar. Feeling no inclination to message the bad registrar and wait for them not to respond I again called the registry.

I still wasn’t the contact of record, but this time the interaction was a bit faster to do, as they emailed the key to the previous maintainer and I called them to forward it to me. I input that key to the transfer form at Gandi and BAM: ”Error, previous registrar refused transfer”.

At this point the whois database reflected the move to Gandi, but Gandi themselves showed the transfer as not being completed. I sent a message to Gandi support and received a whole lot of silence, followed by a ”we have forwarded your request to the appropriate team”, followed by a whole lot of silence.

Thinking ”fine, let’s try another registrar” I then filled out a transfer form with a Finnish registrar that had a phone number listed in the support section. I put in the name of the domain, some contact details and the transfer key I had and got another error. The astute reader might have noticed that at no point did I mention getting another single use transfer key. That’s because I hadn’t noticed the slight change of wording from ”authorization key” to ”transfer key”, and thus didn’t know that the new keys were single use only.

No matter, I knew what to do: just call the registry again, get them to email one more key, call the previous web person once again and get on with my life. Only if it were so simple. With the previous call they had provided the key with no questions asked, because the domain was expired and there was no registrar on record. This time as far as they were concerned, the domain was at Gandi and I should ask them for the transfer key. Only if after 5 days they hadn’t provided the key could I ask the registry directly for the key.

Not having 5 days to spare, I resigned myself to having to work it out with Gandi. I let the third registrar know that I won’t be needing them after all and tried to rush Gandi to just fix the transfer in their end. Sending emails didn’t seem to move the process along, but then I remembered something, and here comes the part of this post that provides an actual useful tip you can implement in your own life (if you are a Gandi customer):

The current Gandi site has less functionality than the old site, but you can still access the old site at https://v4.gandi.net/. The crucial piece of functionality missing from the new site is the live chat support. I got hold of a person through the live chat and they could do some manual magic to complete the transfer. After that it was a simple matter of installing the sites from backups, setting up DNS records, and inputting forwarding addresses for emails.

Why I crowd funded a GNU/Linux phone

Purism is running a campaign to build a phone for those of us who want to control the devices in our hands instead of having the devices control us. It’s called the Librem 5. The price is 600 USD with free international shipping, which I think is a fair price.

On the current state of mobile

At the moment there are two commercially available options for a phone with some smarts. A phone from a number of companies running Android with Google Experience (at least in the west) or an iPhone from Apple. Out of the box the Android device is slightly better in terms of freedom as the user can enable installing any apps on it. The iPhone is probably better for privacy, but with proprietary software it’s down to trust to believe it really is as they say.

User control is in a pretty terrible state on both as both companies can go in your phone and add or remove software or enable location tracking without your consent. They don’t usually do that, but it’s not a secret that they technically can. Installing software from the Play Store using a web browser or enabling Find My iPhone by definition requires this.

What can you do?

You can get a better experience in today’s market as well. Android phones can be retrofitted with a different operating system. There have been various contenders other than Android, for example: Firefox OS, Ubuntu Touch, Plasma Mobile. Two of the first had companies with budgets working on them but none of them reached a state of working well on any device I had access to.

Why is that? Plasma mobile is a small project and it’s not ready, period. The other two supposedly worked fine on some reference devices. All of these run on devices intended for Android, using the low level parts of Android and substituting their own components higher up the stack.

Android with Google Experience, the operating system you get installed on a phone out of the box is based on the Android Open Source Project (AOSP). AOSP in turn has the Linux kernel at its core, and Linux is published with the GNU General Public License. This is the crucial reason why you can boot any law abiding phone (not all phones are law abiding, mind you) to a free and open source system. Google hates the GPL, though so that is the only part that guarantees access to sources. Instead of Busybox, there’s Toybox. Instead of glibc, there’s bionic. And therein lies the problem.

Google publishes the source code of AOSP, but for the phone to function, a bunch of additional binary blobs (drivers, firmware, shared libraries) are needed. The Replicant project has gotten some devices mostly working with free software, but even with these old models some parts of the hardware simply can’t be used (important parts, such as WiFi, Bluetooth). For some time I had a Nexus 5 that worked perfectly with LineageOS. Then I dropped it and the screen started displaying exclusively artistic colours.

Google doesn’t do Nexus devices anymore, so I bought a Oneplus 5. The list of proprietary blobs needed is a whopping 773 items long. 773. Out of those 576 are .so-files. Currently I have a version of SlimROM, with media or ringer sound only working through headphones or Bluetooth. A newer weekly has the fingerprint sensor / home button not working. Lineage both as I compiled it and the first weekly enter a boot loop.

Screw that.

Now is the time to vote with your wallet

Now is the time to get to market a device where you don’t have to futz with binary drivers meant for another system with the nightmare that is libhybris. (Really libhybris is better than nothing, I’m glad it exists). A device that comes with a free system, one that can easily run any Linux distro, such as Arch or Debian or Fedora. A project that has a track record of successful launches and a reasonable price (as opposed to Neo900, the previous time I was hopeful).

Google might keep publishing the source code, but it is really the GPL keeping the other OEMs in check. Big companies, like VMware have found it too big an effort to rewrite the functionality of Linux, but there’s no guarantee that’s going to be true in the future. Google is working on Fuchsia to possibly replace Linux. If we want to have software under our control, we need to look into the hardware as well. General purpose hardware with the ability to run any software might be a dying breed if we are not vigilant.

I want the Librem 5 for myself. I want Purism to be successful enough that I can get a replacement device when the first one breaks. It would be great to get the devices to normal people in physical stores, but I don’t think that’s a realistic goal, not yet.

I want the crowd funding campaign to reach 100%. I want the dream to come true.

If you agree or disagree, feel free to tell me and the world in Twitter or in the comments.

Turning a Cambridge Audio Amp on with a Phone

The too long; didn’t read of it

What hardware you’ll need
  • An infra red LED
  • A resistor
  • A Raspberry Pi
  • Jumper wires
  • A breadboard
  • Optionally: A visible light LED for practicing
Tutorials/material I followed

Motivation

I have a Bluetooth DAC (Digital to Analog Converter) connected to my amp. What this means, is that from the comfort of my hammock, I can connect my phone to it and cast audio wirelessly to a black box that then transmit it to a traditional amp with an RCA cable. Until this project, I did have to either a) happen to have the remote control on me (never happened), or b) walk over to press the standby button to turn the amp on.

ech

I like walking as much as the next person when I’m doing it by choice, but this is definitely a situation that needed improving.

Mapping out options

I have a Cambridge Audio Azur 740A

IMG_20170824_161410

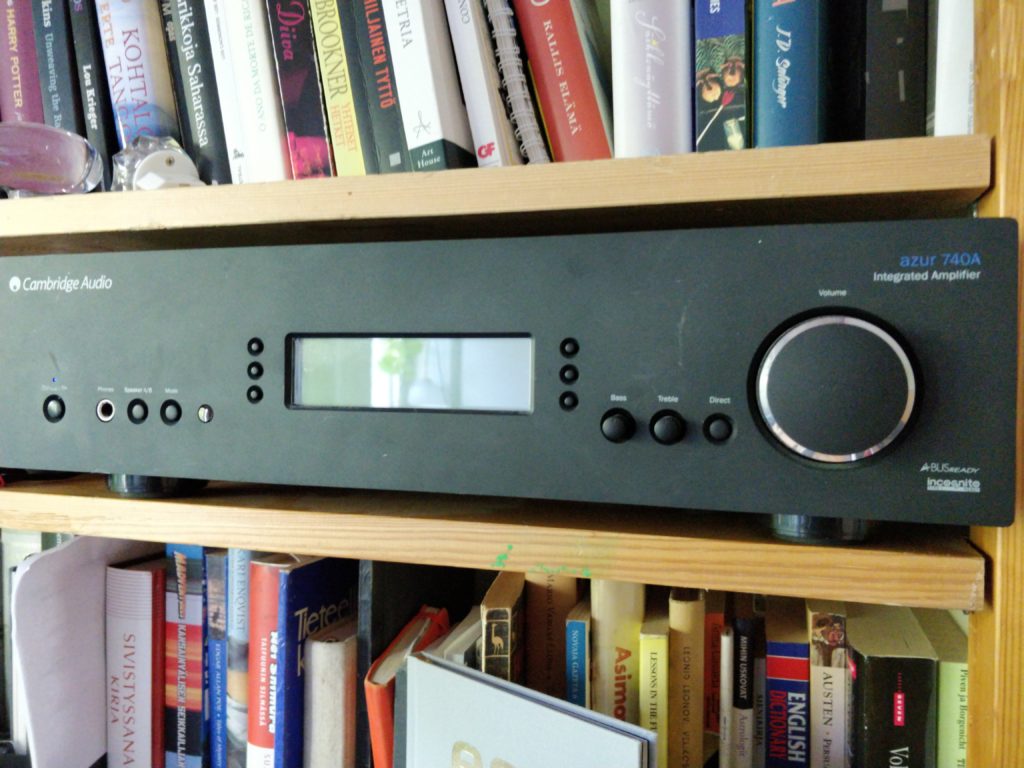
It’s not overly expensive and not all that new, but I thought it might have some controlling interface. Turns out that it actually does

IMG_20170824_162036

It’s a thing called ABus, and from what I could gather, it would seem that it’s an extremely proprietary thing. I could be wrong, but it’s at least correct to say that I got discouraged enough not to even try.

Instead, what immediately felt possible to emulate for me was this

IMG_20170824_162830

The remote. Remote controls often work by simply flashing an infrared light bulb or LED in a certain rhythm at an infrared sensor (that’s why you have to point with them whereas bluetooth or radio controllers can point in any direction). This one is no exception.

IMG_20170824_162847IMG_20170824_163037

With the plan in place, the rest is implementation details. I’ll go over the steps and link to the tutorials I followed on each step. I won’t repeat things that are well explained in the linked material and each step assumes a successful completion of the previous step.

Basics

Even though I have a physics degree, it’s from theoretical physics and turns out I had to start my electronics project from the very basics, with a tutorial on how to turn on an LED with the GPIO pins of the Raspberry Pi. Here it’s easier to start with a visible light LED, as you can see visible light with your eyes. If you only have an infra red LED, you can use a digital camera (such as the one in your phone) to see infra red.

IR

Sending remote control commands from an IR LED with a Raspberry Pi

Here again it’s simpler to practice with a visible light LED. In the previous step we just turned on and off an LED for a second at a time. That’s fun, but won’t cut it for remote control as the sequences needed are much faster. In fact as I gather, no user space code at time of writing can be fast enough to reliably handle the task with the Raspberry Pi (and I have a 1st gen model, so it’s even slower than current models).

Luckily the standard software for emulating a remote control under Linux is LIRC (Linux Infrared Remote Control) and it has a kernel driver for the Raspberry Pi.

I followed this tutorial. My Raspberry Pi has Arch Linux ARM instead of Raspbian, so for me some of the config files of LIRC were a bit different than the ones in the tutorial. Here are the values I used.

Instead of /etc/modules, I have /etc/modules-load.d/22-lirc.conf with contents

lirc_dev
lirc_rpi gpio_in_pin=23 gpio_out_pin=18

Notice that gpio_out_pin has a different value, because my cables are arranged according to the tutorial from the first step. The value of gpio_in_pin doesn’t matter, because I don’t have anything connected there. That would be useful if I wanted to use LIRC also to learn the correct codes by example from the original remote control, but as we’ll soon see that wasn’t necessary here.

Instead of /etc/lirc/hardware.conf I have /etc/lirc/lircmd.conf with contents

[lircd]                
nodaemon        = False                        
driver          = default                      
device          = /dev/lirc0                   
output          = /var/run/lirc/lircd          
pidfile         = /var/run/lirc/lircd.pid      
plugindir       = /usr/lib/lirc/plugins        
permission      = 666  
allow-simulate  = No   
repeat-max      = 600  

[lircmd]               
uinput          = True 
nodaemon        = False

And finally even though the tutorial claims that modifying /boot/config.txt is necessary only on older kernels, it still didn’t work before I did. Here are the contents of that file

dtoverlay=lirc-rpi,gpio_in_pin=23,gpio_out_pin=18
gpu_mem=64
initramfs initramfs-linux.img followkernel

Update 2019-06-13: On Raspbian now lirc-rpi is deprecated, but gpio-ir works as a drop-in replacement for the purposes in this article. In /boot/config.txt one needs to put

dtoverlay=gpio-ir-tx,gpio_pin=18

End update

The LIRC tutorial uses a more complex circuit, but I found that the one from the basic tutorial was sufficient.

The installation of LIRC on Arch Linux ARM didn’t contain any useful configurations for actual remote control codes, so before we can even try it, we need to get some.

Getting the specific remote control codes for the specific device

In the general case you can get the codes for any device that you have the remote control for. You need an infra red receiver, and you can get one that hooks up over USB and do this step not on a Raspberry Pi but on a bigger machine if you so please. This is not the route I went so I won’t go in to more details about something I don’t know much about.

Luckily Cambridge Audio actually publish the control codes for their equipment. The format, though is a bit dense with little in the way of tutorial information and not something I could immediately use. Even more luckily somebody else has already done the hard work of translating the documentation to a LIRC config file. Just in case you are doing this with something that isn’t the exact same model from the same company that I have, you can try to find your device from the huge tree of supported devices.

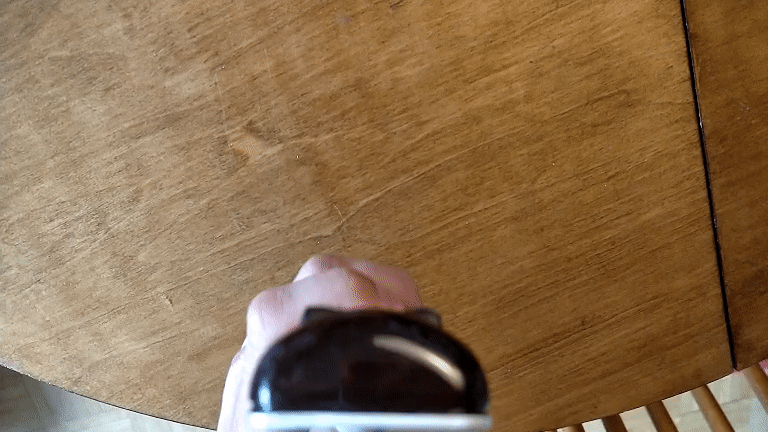
I dropped the config file at /etc/lirc/lircd.conf.d/cambridge.conf and at this point could bring my breadboard up close to the amp and issue

$ /usr/bin/irsend SEND_ONCE Cambridge_X40A_Amplifier KEY_SLEEP

on the Raspberry Pi command line. Lo and behold, the amp actually turned on!

If you didn’t find ready made configs for your device, you can still verify that this step works correctly by using the visible light LED. It should flash very briefly when issuing that command.

Using Home Assistant for a GUI

Connecting over SSH to a Raspberry Pi to turn on an amp is fun, but not really useful. The end goal is to have an app on the phone to do it. There are numerous free and open source home automation projects and I chose to try Home Assistant.

Installing it on the Raspberry Pi was a simple

$ pip3 install homeassistant

Arch Linux ARM uses systemd to manage services, so I put a service file in /etc/systemd/system/home-assistant.service

[Unit]
Description=Home assistant
After=network.target

[Service]
Restart=on-failure
User=YOUR-USER-NAME-HERE

ExecStart=/usr/bin/hass --log-rotate-days 1
RestartForceExitStatus=100

[Install]
WantedBy=multi-user.target

It took me a good while to figure out how to configure Home Assistant to have a button in the UI to run a simple shell command, even though I knew from the Home Assistant Demo (requires Chromium) that it should be possible.

These are the incantations that I put somewhere inside ~/.homeassistant/configuration.yaml (the only other thing there I changed was to enable a password which I’m not showing here for obvious reasons)

shell_command:         
        amp_toggle: /usr/bin/irsend SEND_ONCE Cambridge_X40A_Amplifier KEY_SLEEP          
        amp_plus: /usr/bin/irsend SEND_ONCE Cambridge_X40A_Amplifier KEY_VOLUMEUP         
        amp_minus: /usr/bin/irsend SEND_ONCE Cambridge_X40A_Amplifier KEY_VOLUMEDOWN      
                                               
script:                
        amp_toggle:
            alias: Amp on/off         
            sequence:  
              - service: shell_command.amp_toggle                                         
        amp_plus:  
            alias: Amp more volume       
            sequence:  
              - service: shell_command.amp_plus                                           
        amp_minus: 
            alias: Amp less volume    
            sequence:  
              - service: shell_command.amp_minus

The trick that took me a while to figure out was that you need both shell_command and script.

At this point you should be able to point your Chromium/Chrome (it really does not work with e.g. Firefox, because it’s checking for Web Components support in a way that passes in Firefox and thus it’s not loading fallback JS, but in actuality the thing still does not work) to http://[IP address or domain name of your Raspberry Pi]:8123/ and click on the Activate buttons.

Finally, the app

Using a web browser is fine and good on my laptop, but the only way I’ve found to reliably get audio over Bluetooth on my Linux laptop is to use an external USB Bluetooth adapter from Technoethical, and I don’t have it on the machine at all times. The internal adapter, even with the binary blob installed only works every once in a while. So I use my phone to listen to audio.

There is an unofficial Android app for Home Assistant, and it’s on F-Droid. Unfortunately, at the time of writing the version on F-Droid didn’t work at all, so I compiled the latest upstream code.

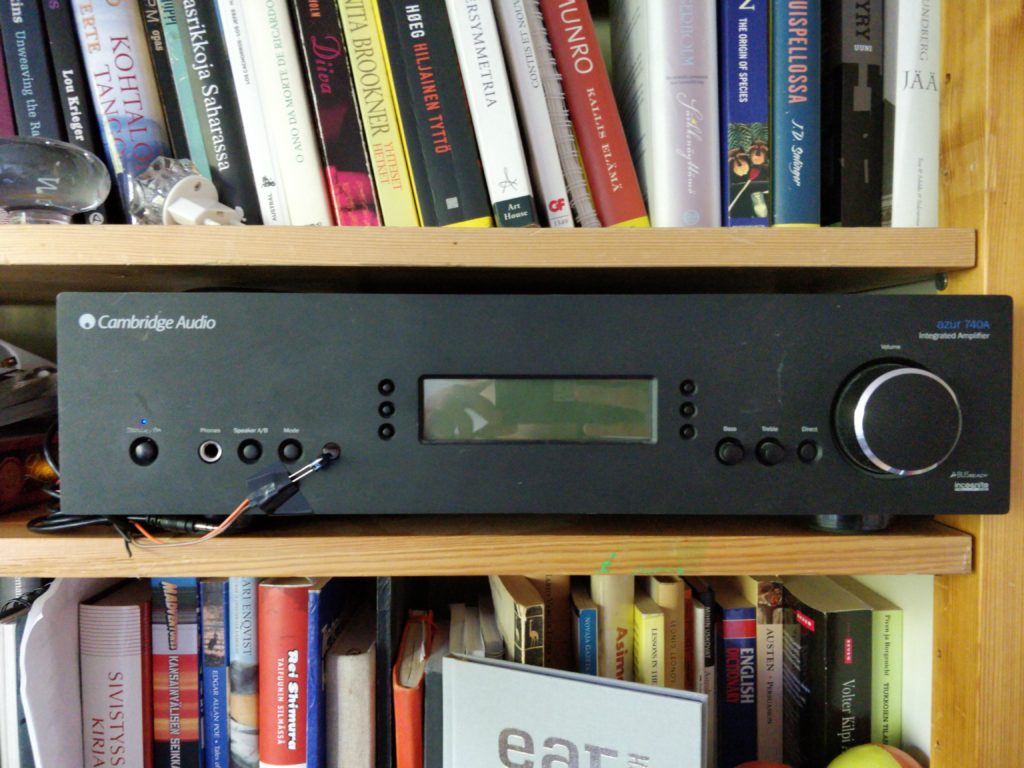
And that’s it! That is the whole stack from the electronics down to having an app with a button I can tap. Add a bit of electric tape to hold the LED close to the sensor and we are officially in production!

IMG_20170824_161343

Legalities

All images and text copyright Daniel Landau, some rights reserved.

Creative Commons License
Turning a Cambridge Audio Amp on with a Phone by Daniel Landau is licensed under a Creative Commons Attribution-ShareAlike 4.0 International License.